Website Logo. Upload to /source/logo.png ; disable in /source/_includes/logo.html

Hacker School Log

Laura Skelton | Summer 2014 Batch

Hacker School Week 7: Hardware Projects, Photo Booth, and Epic Summer Party!

I spent a large part of the week coordinating various awesome hardware projects and plans to get ready for the big party I planned on Friday! I got approval a few weeks ago from the Hacker School facilitators to plan a big summer bash in the Hacker School space, and it was an amazing experience to see everything come together for the big event this weekend.

I posted a thread on our internal chat program letting people know that a big party was happening, sharing my plans for multiple photo booths and some LED decor, and asked my fellow Hacker Schoolers if anyone wanted to add their own party-related project to the event. I was so excited when a bunch of great people jumped on board with even more amazing ideas using Adafruit Neopixel programmable LED strips, sound sensors, Arduino, and even robotics to add extra awesomeness to the event. I coordinated between Sonali and the party project creators and worked on keeping projects on track for the event and linking up helpers with project creators who needed extra hands for soldering or design work. It was incredibly fun and energizing to work with such an enthusiastic group of creators on bringing this event together!

For my contribution, I paired with Jorge on setting up his Raspberry Pi to control my nice Canon DSLR camera so that we could upgrade the quality of the photo booth photos for the party. This worked beautifully! We thought this was going to be a bit tricky and might involve hacks and soldering and USB sniffing, but then we found a library called gphoto that was already pre-programmed with all of the USB commands for my camera.

Jorge connected the Raspberry Pi to the local Hacker School WiFi, wrote a Go script that listened for my iPad to request an IP address from the Raspberry Pi, then triggered the camera and returned the captured photo. I extended the camera options of my Block Party photo booth iOS app to include the Raspberry Pi-controlled DSLR, in addition to the existing options of a GoPro camera and the built-in device camera.

The booth has a giant glowing red button from Sparkfun that I soldered together with a button that triggers a volume-up press through the iPad’s headphone input. My app listens for the volume-up press, and when it detects one, it updates an external display on the front of the photo booth (made from a replacement laptop screen) to count down 3…2…1 until the photo is taken. Then it triggers a script that sends a request to the Raspberry Pi. The Raspberry Pi, in turn, triggers the Canon DSLR to take a photo. When the Raspberry Pi detects a new photo saved in the camera, it copies it and sends it as the response to my iPad’s request.

The iPad saves the photo, crops and filters it, and displays it on the external display to the user, while simultaneously uploading it to the Block Party server. My iPod is connected to the same Block Party event as the photo booth, and when a new photo is uploaded to the server, the iPod downloads it and adds it to the slideshow of all the photos from the night that it is playing on an external projector display at the party.

I spent several hours building a new enclosure for the photo booth, set it up at the party, and it was a huge hit! I also built a small enclosure for a second photo booth that was set up with an iPod using its built-in camera to take photos with my ASCII-art filter, which we projected on a large wall throughout the party.

There were some AMAZING projects that people pulled together for the event. Georgi worked on turning the quadcopter into a party drone, to capture the event from above.

Puneeth and Kyle made this beautiful LED sound-reactive equalizer display with help and LED supplies from Dana which added some radness to the dance floor.

Nick ran LED light strips all along the windows of the front of the space, and had them pulse with the music he DJ’d all night using a neat trick of using the audio line’s voltage variation to directly alter the brightness of the LED string lights.

This project was hilarious due to the late-night whiteboarding and discussion of how the problem of how to place the light strings around the window squares to have full coverage with minimal overlap was an NP-complete problem similar to the Travelling Salesman problem. It was a very Hacker School approach to party decor.

Travis McDemus brought a super cool drum that reacted to drum-hits by shooting LED lights up and down the sides. It was a huge hit with everyone, and it was especially cool how the lights changed color with every drum hit.

There were even more cool projects going on throughout the party, including some beautiful LED strip installations that Dana made with some other Hacker Schoolers that were programmable via Bluetooth LE.

It was such a blast! It was great that so many Hacker School alumni came out that night. It was so much fun having projects we had worked on that were shared and enjoyed for the whole evening, and I hope we set a precedent for future Hacker School batches to do their own open house parties with fun projects to showcase.

Thanks to Andrew and Rachel for documenting the party so beautifully!

Hacker School Week 6: Modular Application Design and Swift in the Terminal

This week I worked on fleshing out my rewrite of BeerChooser, my first iPhone app from 2010. I had written a Beer List module last week, and I realized that I could use several instances of this same module for each of the tabs in my beer app, instead of the similar-but-separate view controllers of my original app. This fits well with my goal of making bug-discouraging, maintainable code using a more modular architecture than is usually used in iOS development.

I realized that the only things that were different in each tab in my beer app were the title, the tab image, and the data source for the list of beers, and that I could create something that would allow me to change only these settings for each instance of the beer list module.

At first, I used an enum for the different tab settings.

1
2
3
4
5
6
7
8
9
10
//  PageTypeDef.h

typedef NS_ENUM(NSInteger, PageType) {
    firstPage = 0,
    PAGE_NEARBY = firstPage,
    PAGE_RATINGS,
    PAGE_POPULAR,
    PAGE_SUGGESTIONS,
    lastPage = PAGE_SUGGESTIONS
};

This worked, and took advantage of reusing the module code like I wanted (which eliminates the bugs you can get from having to copy a change over to nearly-identical code in another class), but it was not a very object-oriented programming way of doing things, and it created work and bug-possibilities due to all of the switch statements it needed for managing the different property settings for each enum type.

1
2
3
4
5
6
7
8
9
10
11
12
13
14
15
16
17
18
19
20
+ (NSString *)sectionTitleForType:(PageType)pageType
{
    switch (pageType) {
        case PAGE_NEARBY:
            return @"Nearby Beers";
            break;
        case PAGE_POPULAR:
            return @"Popular Beers";
            break;
        case PAGE_RATINGS:
            return @"Your Ratings";
            break;
        case PAGE_SUGGESTIONS:
            return @"Beers to Try";
            break;

        default:
            break;
    }
}

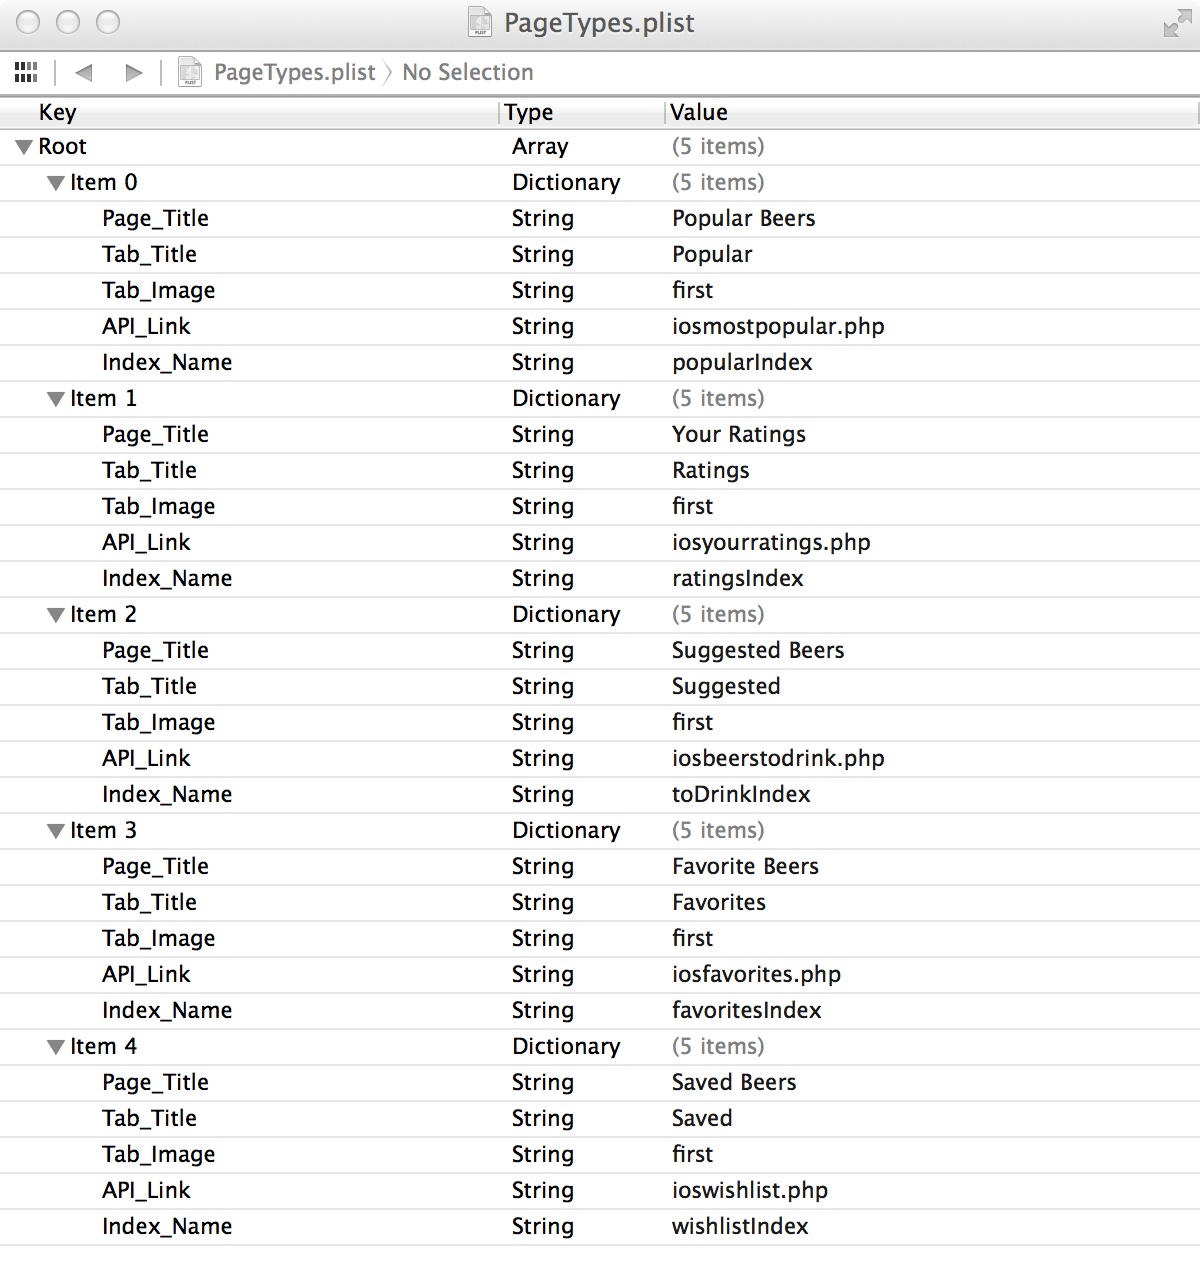
After talking through some of the problems with this solution, I had the idea of using a Property List to define the particulars of each tab, and the loading the .plist into a class and pulling out the dictionary keys of each tab to define the settings for that Beer List module instance.

This greatly simplified the code for defining the properties of a Beer List instance, and makes it incredibly easy to update and maintain, with a low likelihood of introducing bugs through editing page titles. To reorder the tabs, I just drag that tab’s dictionary to a different position in the Property List array, and the tabs reorder themselves to match.

1
2
3
4
5
6
7
8
9
10
11
12
13
14
15
16
17
18
19
20
21
22
23
24
- (NSString *)pageTitle
{
    return self.plist[PageTitleKey];
}

- (NSString *)tabTitle
{
    return self.plist[TabTitleKey];
}

- (NSString *)tabImageName
{
    return self.plist[TabImageKey];
}

- (NSString *)apiLink
{
    return self.plist[APILinkKey];
}

- (NSString *)indexKey
{
    return self.plist[IndexNameKey];
}

I figured out a sensible way to add a network API manager within the framework of the VIPER software architecture model. In order to keep network separated from the rest of my application code, I created a network API manager in a similar way to the local data store manager.

There’s a base API manager class for the entire application, which is the only class that actually talks to the server and knows that I’m using the AFNetworking framework to manage server requests. This is awesome because if I decide to use another framework, I only have to worry about updating one file. This same file loads in my secret Configuration variables (like my OAuth Client ID and Client Secret, which are cleverly hidden from my public GitHub repository using this technique Mike Walker shared with me), and remembers the base URL of my server. It knows how to send a general POST request to the server, and adds the authentication parameters to the request it’s told to send.

Then, each module has its own API manager that’s in charge of talking to the base API manager, which calls the API link for the instance, and manages saving the beers with the proper index for that instance.

I’ve found that using a more robust, maintainable architecture in my application has slowed down my development a bit, as for each feature I add (such as communicating with an API), I have to stop and think about the smartest way to implement that feature to keep to the goal of modular code with different aspects kept separated. The plus side is that it seems to just work in a way that Massive View Controller-style programming often does not, so some of the initial design time is saved in much less debugging time. Plus, as soon as you need to make a change (to the view layout, to the data store, etc), the time saved by having those aspects of the code in their own isolated files more than makes up for the initial time invested in separating these functions intelligently.

On Friday, I worked with Tom on Google’s Store Credit challenge in Swift.

The problem:

You receive a credit C at a local store and would like to buy two items. You first walk through the store and create a list L of all available items. From this list you would like to buy two items that add up to the entire value of the credit. The solution you provide will consist of the two integers indicating the positions of the items in your list (smaller number first).

We spent a good amount of time figuring out how to use Swift to run in the terminal instead of how it would typically be used in Xcode as a file within an app project target. We were successful with this, and figured out not only how to read in text from a file on the local filesystem and output our answer to another local text file, but were successful in calling a Swift file to run in the terminal.

Running in the terminal:

1
/Applications/Xcode6-Beta3.app/Contents/Developer/Toolchains/XcodeDefault.xctoolchain/usr/bin/swift -i StoreCredit.swift

Reading and writing text:

1
2
3
4
5
//reading
var text : String! = String.stringWithContentsOfFile(path, encoding: NSUTF8StringEncoding, error: nil)

//writing
outputString.writeToFile(pathAnswer, atomically: false, encoding: NSUTF8StringEncoding, error: nil)

This is great, because for larger computations like this, Swift Playgrounds will crash, or run so slowly that they never find an answer.

The coding challenge itself was a lot of fun. We created a dictionary that, for each item we found, stored its cost as a key in a dictionary, with the value being an array of each position in the original list of items where the item was found.

1
2
3
4
5
6
7
8
9
10
11
12
13
14
15
16
17
18
func findMatches(items:[NSInteger], keysDictionary:[NSInteger: [Int]], credit: NSInteger) -> (Int, Int)? {

    for anItem in items {

        let pairMatch : NSInteger = credit - anItem
        if let pairMatchPositions = keysDictionary[pairMatch] {
            // found a match
            if pairMatch == anItem {
                if pairMatchPositions.count < 2 {
                    continue
                }
                return (pairMatchPositions[0], pairMatchPositions[1])
            }
            return (keysDictionary[anItem]![0], pairMatchPositions[0])
        }
    }
    return nil
}

This solved the problem we initially ran into with repeated items being the answer, when we were using a dictionary with the keys being items, and the values being the (single) position where we found that item.

Every time we added a new item to the dictionary, we looked to see if the difference between that item and the store credit had been previously stored in the dictionary. If it was there, then we had our pair of items that we could buy with the store credit.

This was a TON of fun. I especially enjoyed starting off whiteboarding the problem, and discussing how various solutions would change if the constraints of the problem changed slightly, and then moving on to more individual coding solutions to the problem. I’m hoping to spend a lot more time doing fun challenges like this in the coming weeks!

Hacker School Week 5: VIPER iOS Architecture and Recursion

I decided that for the rest of my time at Hacker School, I’m going to work on rewriting from scratch my very first iPhone app, BeerChooser, including the entire iOS app, the server-side API, and a simple responsive web app.

I wrote the BeerChooser website as my first major development project back in 2009. It took existing user ratings of different beers to predict what someone would think of a beer they hadn’t tried yet. I taught myself Objective-C in 2010 and released it as an iPhone app that fall. It was featured in the App Store and several thousand users signed up, recording over 200,000 beer ratings.

I’m in the process of rewriting BeerChooser using all of the things I’ve learned in the intervening years. It has unit tests using the Specta framework, continuous integration through GitHub and Travis CI, and a highly modular, testable architecture inspired by the new VIPER model.

This week, I learned how to use a bunch of new iOS development tools, and finished writing the main module of the app using a VIPER-inspired architecture, which is a list of beers with their predicted ratings connected to the server API.

VIPER is an application of Clean Architecture to iOS apps. It attempts to solve the common issue of the way the software architectural pattern MVC (Model-View-Controller) works out in iOS to result in Massive View Controllers.

This results in code that is very difficult to reuse and even to maintain. The data is mixed up in the view controller, which may be a delegate for many other things that are happening in the app other than just displaying the view. The User Interface code tends to get mixed up within the same file that is controlling much of the application’s behavior, making it a huge undertaking to make changes to the user interface, and forcing you to rewrite tests to ensure that your application’s basic behavior is still working after you change the look of the app.

VIPER separates out each basic function of the app into its own module, and within the module it separates out methods pertaining to the view/user interface (the View) from methods which react to user inputs and prepares content for display (the Presenter), from methods which contain the main business logic of the app (the Interactor), from Entities (the data objects used by the Interactor), from Routing (the wireframes that present and dismiss views at appropriate times), from the Data Managers that talk to the Data Store.

This makes it MUCH easier to change out one of these pieces entirely (such as changing the UI from a list of items to a grid of thumbnails, or changing the data store from Core Data to simple SQLite, without affecting the other pieces at all. It also means that, when starting a new app project, you can reuse much of your well-tested code from an older project, and only change out the pieces related to different types of data or a different interface look in the new app.

Moving forward, I’m going to work on re-creating the multiple tabs of the original app, which had different beer lists including suggested beers you’d like, your previous ratings, nearby beers, search, and a list of widely available beers to get started with rating. It’s been intersting thinking about the best way to structure the data to account for the separate lists, figuring out when and how the data should refresh, and how to integrate the network calls to the API with the app’s data managers to follow the spirit of the VIPER model.

On Friday, I worked on some Recursion exercises. I decided to implement these in Swift, to get a chance to practice with the new language, and also because Swift playgrounds are perfect for implementing new algorithms and data structures and getting immediate feedback on how they are working. I found that the trickier problems were a lot easier if I first broke them down into a few simple cases, such as for 2 or 3 items. I wrote functions for those cases, then could visualize much more easily what the general recursive function would look like for n items, and was able to write that.

1
2
3
4
5
6
7
8
9
10
11
12
13
14
15
16
17
18
19
20
21
22
23
24
25
26
27
28
29
30
31
32
33
34
35
36
// function for returning all reordering variations of an array of characters

// for string of n, there are n times swap(n-1) variations

// swap n items
func swapn(letters: [Character]) -> [[Character]] {
    var returnArray : [[Character]] = []

    if letters.count < 2 {
        // return letters, because it is only variation
        return [letters]
    }

    // special case to swap 2 characters
    if letters.count == 2 {
        var thisArray = letters
        returnArray += thisArray
        let second = thisArray[1]
        thisArray[1] = thisArray[0]
        thisArray[0] = second
        returnArray += thisArray
        return returnArray
    }

    for index in 0..<letters.count {
        var thisArray = letters
        let removed = thisArray.removeAtIndex(index)
        let nArr = swapn(thisArray)
        for anArray in nArr {
            var newArr = anArray
            newArr.insert(removed, atIndex: index)
            returnArray += newArr
        }
    }
    return returnArray
}

I also learned about memoizing from working on a Fibonacci function (where each number is the sum of the previous two numbers). My original simple implementation was easy, but since it calculated every number from scratch, it got extremely slow with numbers that were slightly larger.

1
2
3
4
5
6
7
8
9
// Fibonacci
    func fibSimple(n:Int) -> Int {
        if n == 0 {
            return 0
        } else if n == 1 {
            return 1
        }
        return fibSimple(n-1) + fibSimple(n-2)
    }

“Memoizing” just meant implementing the function the same way I would do the calculations by hand. I wouldn’t look all the way back to fib[0] to calculate fib[12] – I would save the first time I calculated fib[10] and fib[11] and use those stored values to quickly calculate fib[12]. I wrote a new function that used an array to store previously calculated values of fib, and because Swift automatically compiles, I could see right away how dramatically faster this was than the original implementation.

1
2
3
4
5
6
7
8
9
10
11
12
13
14
15
16
class fib {
    var arrayCache: [Int]

    init () {
        self.arrayCache = [0,1]
    }

    // Fibonacci
    // Memoized Array
    func fibArr(n:Int) -> Int {
        if arrayCache.count <= n {
            arrayCache += fibArr(n-1) + fibArr(n-2)
        }
        return arrayCache[n]
    }
}

I also learned how to take advantage of Tail Calls in recursive functions. Here’s one way to set up a simple function that returns the sum of numbers in an array.

1
2
3
4
5
6
7
8
func listSum (numbers: [Int]) -> Int {
    if numbers.count == 0 {
        return 0
    }
    var nextNumbers = numbers
    var thisNum = nextNumbers.removeAtIndex(0)
    return thisNum + listSum(nextNumbers)
}

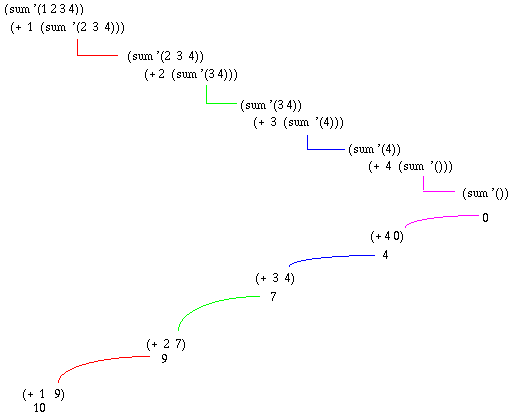
This works, but the problem is that the function ends up stacking up a whole bunch of function calls until it finally gets a value for the last listSum (when numbers.count finally is zero), then it has to go back up through each level and add in thisNum until it gets back to the top. This is fine if you have, say, 10 numbers to add up, but if you had a very large array, remembering all of those nested functions would overwhelm the computer.

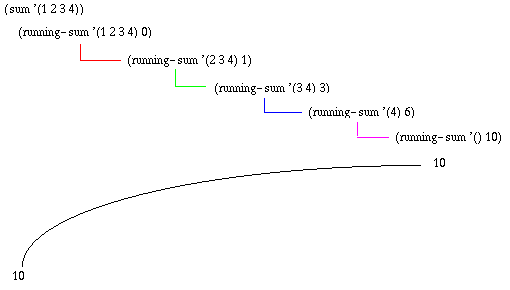
Instead, there’s a tricky way to rewrite this so that the entire calculation is passed along to the next call of the recursive function. Then, the entire sum calculation happens when the recursion gets to the bottom (when numbers.count is zero), and it doesn’t ever need to come back up to the highest-level function call, it just needs to return that final calculation. The trick is that the computer realizes it can forget about all of those nested functions, and just move the return along to the new recursive function call each time the entire calculation is passed along. Here’s an example of how to rewrite the above sum function to take advantage of a tail call.

1
2
3
4
5
6
7
8
9
func listSum (numbers:[Int], sum_so_far:Int) -> Int {
    if numbers.count == 0 {
        return sum_so_far
    }
    var newSum = sum_so_far + numbers[0]
    var nextNumbers = numbers
    nextNumbers.removeAtIndex(0)
    return listSum(nextNumbers, newSum)
}

This way, it skips all of those nested calculations and just returns the value calculated at the end.

In other news, Anatoly visited, and we got a chance to explore the city a bit outside of Hacker School. We checked out an amazing experimental theater project called Then She Fell, which might have been the best theatrical performance I’ve ever been to. It is a totally immersive, participatory experience based on the writings of Lewis Carroll, with only 15 audience members per show. You are frequently alone with the performers, there are delicious “elixers” served throughout the 2-hour performance, and everyone’s experience is different. I’d highly recommend checking it out!

Hacker School Day 18: Better iOS Testing Tools and Continuous Integration

I continued working on rewriting my Secret Handshake app to be more testable, and writing tests for each method. I moved all of the event management and framework managers out of my view controllers and App Delegate and into their own separate modular implementation files. The delegate callbacks for each of them are now handled by the App Delegate, which manages communication between them upon certain events, such as when the Hacker School API Manager finishes downloading my profile details, the iBeacon Transmitter Handler should start broadcasting my User ID. It’s a much more organized, stable structure, and is much cleaner than it was before, since tasks are much more strictly separated from each other, and the view controllers are handling only things directly related to view management.

I was lucky enough to get some amazing help and advice from Mike Walker about some awesome third-party testing tools for iOS. They are built on top of XCode’s testing functionality, so you still get the advantages of what comes with XCode, with some much more powerful features. It’s this kind of advice that makes me so happy to be at Hacker School. Having a more experienced developer show you the best way to do something and the best tools available for you to use is invaluable, and is an area where self-teaching falls short.

Mike introduced me to Specta, which is a testing framework for iOS that is much more human-readable than using XCode’s built-in testing functionality. It reads like actual specs for the code. You write a series of nested sentences explaining what each piece of code does, and what you expect to happen under different circumstances. Within those statements, you write the actual code test that should validate whether that statement is true in your code.

1
2
3
4
it(@"sets the user's name when the user loads", ^{
    [_view.user load];
    expect(_view.nameLabel.text).will.equal(@"Ben Day");
});

With Expecta, you can write your actual test to read like English, which also helps the whole thing to read like a clear outline of your code. This was so exciting to me after working the day before and finding it helped if I wrote in comments above each test what Specta and Expecta include in the tests themselves. If a test fails, it gives useful errors showing you exactly how the code did not meet the specifications.

Instead of something like,

1
2
3
4
assertThat(@"foo", is(equalTo(@"foo")));
assertThatUnsignedInteger(foo, isNot(equalToUnsignedInteger(1)));
assertThatBool([bar isBar], is(equalToBool(YES)));
assertThatDouble(baz, is(equalToDouble(3.14159)));

you would use Expecta to write something much more readable, like

1
2
3
4
expect(@"foo").to.equal(@"foo");
expect(foo).notTo.equal(1);
expect([bar isBar]).to.equal(YES);
expect(baz).to.equal(3.14159);

I love how it reads so clearly. The human-readable clarity makes it so much faster to spot inconsistencies and errors than when you are devoting more brain power to untangling a less logically-organized series of statements.

Mike also suggested using OCMockito to create mock objects for my projects, which should help with some of the more complicated frameworks I’m using in my iBeacon app.

These testing tools apparently are Objective-C implementations of testing frameworks from the Ruby community. This makes picking up these tools as an Objective-C developer somewhat challenging. The tutorials out there are mainly focused on Ruby developers who are familiar with the frameworks in Ruby, and need to know how to use those same tools in an Objective-C project. The new-to-testing tutorials are much more commonly for Ruby developers. After some searching time, I’ve found some documentation and overviews in Objective-C that I’m going to work through this week, on Unit Testing in Objective-C, using Specta, Expecta, and OCMockito in Objective-C, and Testing in iOS.

In order to use all of these great 3rd party tools, I’m going to have to get over my frustration with CocoaPods and get some practice using that tool to automatically integrate these different tools with my new XCode projects. I don’t like giving up the ability to manually manage these dependencies in XCode (especially when it comes to getting rid of a 3rd party project) and using command-line Ruby tools instead to integrate dependencies, but it’s become clear that the benefits outweight this annoyance.

One of the most exciting new tools I’m going to start using is Travis CI. Travis offers continuous integration for projects hosted on GitHub, and it has supported iOS since April 2013. Continuous integration is great because it automatically checks for problems each time you build or commit your code. If a change you made breaks some other part of the code which, especially in a larger project, you might not have even realized was dependent upon what you were working on, Travis will automatically check and let you know immediately that there’s a problem. This early-warning system can be hugely helpful, because it’s so much easier to fix these kinds of problems the sooner you know about them, before you’ve built more code on top of that initial change. It’s especially important for larger projects, such as some of the open-source projects on GitHub, because it warns you right away when a pull request fails Travis CI’s automatic checks. I’m going to work my way through this tutorial on Travis CI for iOS, as it seems to need a hefty amount of configuration to take full advantage of its potential.

I got a little overwhelmed after all this about just how much I have to learn and how many new tools I need to get comfortable with to become a more awesome iOS developer. The silver lining here is that it’s completely broken through the directionless feeling I had a bit of last week, where I felt like, sure I can come up with some fun iOS projects or learn some new library, but I didn’t feel like I was becoming a much more solid programmer by doing those things.

I decided I’m going to spend as much time over the next month of Hacker School working on a completely from-scratch rewrite of BeerChooser, my first-ever iOS app from back in 2010. It was a decent app considering I started learning Objective-C just that year, and it even was featured in the Lifestyle section of the App Store when it first came out, but I’ve learned SO MUCH since then and it would be amazing to write a useful larger project like this from the ground up using everything I now know about better ways to handle data storage, API integration, and testing.

I’m also planning to rewrite a much cleaner version of the server-side API using Python, as well as a new responsive web app using Javascript to talk to the API and provide the old, bloated website’s functionality to users across multiple platforms. This gives me a chance to get so much practice in with new tools and better practices, as well as a chance to work on some of the other areas I’d like to improve in, like being able to write awesome web apps and work on the API/database integration in a better way. It even lets me work in a bit of Machine Learning, as I’d like to improve the beer recommendations algorithm before I re-launch the app.

Hacker School Day 17: Objective-C Particulars and Conceptual Limits

I learned a bunch of little things about Objective-C today in the course of trying to write good tests for my Secret Handshake app.

After running into a bunch of unhelpful compiler errors, like Member reference type 'struct_objc_class *' is a pointer, I finally figured out the difference between a + and a - in an Objective-C method.

A + at the front of an Objective-C method indicates that it is a Class Method. That means that you don’t need to call that method on a particular instance of the class- you can call it without ever having instantiated the class. For example,

1
2
3
4
5
6
7
8
9
10
11
12
13
14
15
16
17
18
19
+ (NSDictionary *)parseQueryString:(NSString *)query
{
    NSMutableDictionary *dict = [[NSMutableDictionary alloc] initWithCapacity:6];
    NSArray *pairs = [query componentsSeparatedByString:@"&"];

    for (NSString *pair in pairs) {
        NSArray *elements = [pair componentsSeparatedByString:@"="];
        if ([elements count] == 2) {
            NSString *key = [[elements objectAtIndex:0] stringByReplacingPercentEscapesUsingEncoding:NSUTF8StringEncoding];
            NSString *val = [[elements objectAtIndex:1] stringByReplacingPercentEscapesUsingEncoding:NSUTF8StringEncoding];
            [dict setObject:val forKey:key];
            key = nil;
            val = nil;
        }
        elements = nil;
    }
    pairs = nil;
    return dict;
}

I don’t have to instantiate my QueryParser class in order to call this parseQueryString: method to parse a query string into a dictionary. Because the class instance doesn’t need to exist for this method to be called, I’m not allowed to use a reference to self or self.someproperty within a class + method, and it will throw a confusing compiler error if I try to do this. Because I normally use methods that operate on a particular class instance, I rarely use + methods. The parseQueryString: method doesn’t necessarily need a + if I throw it into another class that might need to parse query strings. It only needs the + if I want it to be more modular, and put it into a convenient file full of self-contained methods I might use in many other classes, where it wouldn’t make sense to instantiate some unused object on which to call the method before parsing my string.

I do absolutely need to use the plus when I’m creating a class that’s a singleton. For example,

1
2
3
4
5
6
7
8
9
10
11
+ (OAuthHandler *)sharedHandler
{
    static OAuthHandler *_sharedHandler = nil;
    static dispatch_once_t onceToken;
    dispatch_once(&onceToken, ^{
        _sharedHandler = [[OAuthHandler alloc] init];

    });

    return _sharedHandler;
}

Outside of the OAuthHandler class, I refer to [OAuthHandler sharedHandler], which will either create a single shared instance of the OAuthHandler class for my app, or will return the already-created instance of OAuthHandler. This is a convenient way for me to have one OAuthHandler referenced by several other classes without complicated dependencies. Because the sharedHandler method actually creates the OAuthHandler class instance, it can’t be called on an instance I already have a reference to, so it needs to have a +.

For most other types of methods I’d use in Objective-C, it makes sense to use a -. When I need to run a method that references the specific properties of that instance of the class, I need to use the - type of method. For example, I would use a - method if I needed to configure a view with a specific state.

1
2
3
4
5
6
7
8
9
- (void)configureView {
    // Update the user interface for the detail item.
    if (self.event) {
        self.nameLabel.text = [NSString stringWithFormat:@"%@ %@",self.event.hackerSchooler.first_name, self.event.hackerSchooler.last_name];
        self.batchLabel.text = self.event.hackerSchooler.batch;
        self.profileImageView.image = [UIImage imageWithContentsOfFile:self.event.hackerSchooler.photoFilePath];

    }
}

Because I need to access this particular view controller instance’s properties, such as self.event.hackerSchooler, in order to display this particular person’s name and photo, I must use the - to indicate that this is an Instance Method, and not a Class Method that could be called without a class instance that has specific property settings.

I also learned the difference between a * and a & in Objective-C, and a little bit about how pointers work. Whenever I name an object in Objective-C, I write something like NSString *someString. This * indicates that someString is a pointer to an NSString type object. If I create two strings and try to directly compare their pointers, it will only return true if the pointers are pointing to the exact same instance of the object at the same memory location.

1
2
3
4
5
NSString *firstStringPointer = @"hello world";
NSString *secondStringPointer = @"hello world";
if (firstStringPointer == secondStringPointer) {
  return YES;
}

This string pointer comparison will return false, even though the strings are identical, because they are two different string objects. It’s like, we are checking if two people are the same person, and these two string pointers are the names of identical twins instead of nicknames for the same person, so it will answer that No, this is not the same person, even though the two people are identical.

1
2
3
if ([firstStringPointer isEqualToString:secondStringPointer]) {
  return YES;
}

That’s why we have to use the above type of comparison method if we want to check if two objects have identical properties, instead of whether they are the exact same instance of the object, which is asking a fundamentally different question. Like asking about the identical twins, do these people look exactly the same, and have all of the same features? Yes, they do.

The & I only use when I’m declaring an error that I pass to a method which might or might not return an error. I don’t instantiate the error, but I use the & to create a reference to a location in memory where an NSError object might be put in the future, if the method needs to do so.

1
2
3
4
NSError *error;
  if (![self.fetchedResultsController performFetch:&error]) {
      NSLog(@"Unresolved error: %@", error);
  }

As I understand it, if the performFetch method fails, it will create an NSError object and place it at the memory location referenced by &error. I can subsequently access the NSError object by using the error pointer. If it succeeds, then error is nil.

I also enjoyed reading rntz’s post about Option and Null in dynamic languages. I had some trouble following the explanations in Haskell, as I’m unfamiliar both with the syntax and with the concepts in Haskell that don’t exist in Objective-C.

Ironically, this is part of the point rntz was trying to make (in Appendix A) about how different programming languages can limit the way you conceive of the world, similarly to how native speakers of a language that conflates the colors Blue and Green have trouble visually differentiating the two colors, since their language only creates one cognitive category for the two.

After Anatoly explained a few things about Haskell syntax, as well as the Maybe datatype, which seems to work similarly to ? Optionals in Swift, I followed the explanation a lot better, and it was interesting to recognize that because of the way Objective-C dictionaries are structured, I conceptually conflate a key being set to nil as being the same as a key not being in the dictionary at all, (actually, the way to check in an NSDictionary if a key exists is to see if [dictionary objectForKey:@"someKey"] is nil) and how this could be seen as actually two distinct ideas: One, that the key does exist, but it is nil, and two, that the key does not exist in the dictionary.

The congnitive limits that can come about through the limitations of whichever programming language in which you first reach fluency is something I’ve been struggling with as I’m learning Swift after working within the confines of Objective-C for so long. I can simply translate the way I’ve implemented something in Objective-C into the new syntax that Swift introduces, but this severely limits my ability to take advantage of much more precise and efficient tools that Swift has with which I’m completely unfamiliar. I’m excited about getting better at native Swift tools as I can see this expanding the way I conceptualize code, which would give me tools to be a better programmer in the future in many other languages more powerful than Objective-C.

Hacker School Day 16: ASCII Photo Booth and Unit Testing

I added a filter to my photo booth that turns each photo into an ASCII art image, then deployed the GIF Photo Booth mode I wrote to the live Block Party server.

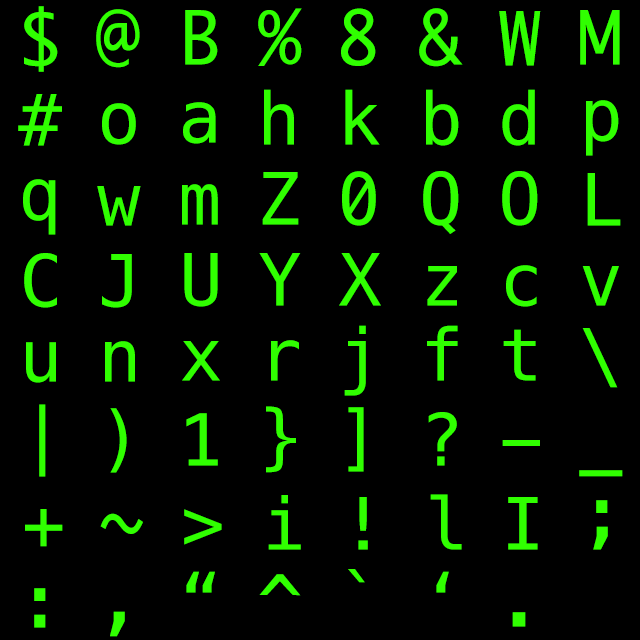
It was amazing how easy it was to extend the Photo Booth filter set to add this new filter. I’m using the Mosaic filter from GPUImage, an open-source Objective-C framework that runs filtering calculations in Open-GL for fast image processing. I used an image containing 64 tiles ranging from lightest to darkest, and the calculations in the Open-GL mosaic filter took a stepped luminosity and selected which tile to display.

1
2
3
4
5
6
7
8
9
10
11
12
13
14
15
16
17
18
19
20
21
22
23
24
25
26
27
28
29
30
31
32
33
34
35
36
37
38
39
40
41
42
(
 precision highp float;

 varying vec2 textureCoordinate;

 uniform sampler2D inputImageTexture;
 uniform sampler2D inputImageTexture2;

 uniform vec2 inputTileSize;
 uniform vec2 displayTileSize;
 uniform float numTiles;
 uniform int colorOn;

 void main()
 {
     vec2 xy = textureCoordinate;
     xy = xy - mod(xy, displayTileSize);

     vec4 lumcoeff = vec4(0.299,0.587,0.114,0.0);

     vec4 inputColor = texture2D(inputImageTexture2, xy);
     float lum = dot(inputColor,lumcoeff);
     lum = 1.0 - lum;

     float stepsize = 1.0 / numTiles;
     float lumStep = (lum - mod(lum, stepsize)) / stepsize;

     float rowStep = 1.0 / inputTileSize.x;
     float x = mod(lumStep, rowStep);
     float y = floor(lumStep / rowStep);

     vec2 startCoord = vec2(float(x) *  inputTileSize.x, float(y) * inputTileSize.y);
     vec2 finalCoord = startCoord + ((textureCoordinate - xy) * (inputTileSize / displayTileSize));

     vec4 color = texture2D(inputImageTexture, finalCoord);
     if (colorOn == 1) {
         color = color * inputColor;
     }
     gl_FragColor = color;

 }
);

I grouped the ASCII filter with a filter I already had that tends to increase facial feature definition, and that seemed to make the ASCII images a bit clearer.

It was so fast to implement the ASCII filter that I had time to do both a light and a dark version, and I was happy to see that I had set up the Block Party app intelligently enough that the filtering menu extended automatically once the new filters were added, and everything just worked!

The GIF mode of the photo booth takes 4 photos in rapid succession, saves them to the camera roll, combines them into a GIF animation, and combines them into a movie file playable on the iPhone (as GIF animations are not supported outside of the browser), then it uploads everything to the server with metadata indicating to the app that it is an animated GIF instead of a JPG so it can be displayed accordingly.

In the process of working with GPUImage’s Mosaic filter, I discovered a small bug in the project, and with Allison’s help I submitted my first Pull request! It was good to get some practice working with a large existing code base and working to improve a small part of it.

In the evening, I learned how to use XCode’s built-in Testing framework.

In the process of rewriting my code so that it was easier to test, everything was just better. The classes and methods naturally became more modular and reusable, it was easy and quickly repeatable to test all of the edge cases, and my code seemed much clearer. I learned that testing can be seen as a sort of specification set for the code and its features. If the class has some expected properties, or a function is expected to behave in a particular way, I can in a way “define” that class’s features by the way that I write the expected outputs of the test functions, sort of like an outline for how I expect my program to behave. I actually think it would help me to be clearer and more organized in the way I develop my code if I start writing these feature-specification tests before I even write the methods and classes they are testing, and build the method code to match the spec, instead of the other way around. This may not always be feasible if something needs to be mocked up very quickly, but I think in general this is how I will try to work moving forward.

This work with testing feels like great progress towards the goal of becoming a better programmer. I’m going to work on rewriting several of my existing projects in this way as it seems to add stability and clarity without having to spend so much time manually checking that everything works.

Hacker School Day 15: Mesh Messaging and ASCII Photo Booths

I completely reworked my ad-hoc mobile networking app. It had been set up so that each time a phone had a message to send, it would advertise itself over Bluetooth LE, connect to other phones as a peripheral, send the message, then close the connection.

I reworked the entire process. Now, the phones are still listening most of the time for other devices, but each periodically broadcasts itself (and becomes discoverable) at random intervals every few minutes. When phones discover each other, they connect and subscribe to push notifications from each other. That way, when there is a message to send, it transmits to all connected devices in a split second.

There’s still some debugging to do with connection stability and perfecting the advertising interval so that devices become connected quickly, but so far it is working quite well! I’m excited to finish getting the base network established so that I can play around with different network setups that could be built with the technology. I was intrigued by some earlier conversations about secure communications and web-of-trust networks, as well as different optimizations for routing the packets beyond simple broadcasting, and it would be cool to use Bluetooth LE to build this.

We were talking about what type of photo booth would be appropriate for a Hacker School party, and I had the idea for a fun modification to the booth that would take 4 photos, turn each into ASCII art (green on a black background), and then make an animated GIF image from them that could be projected continuously during a party, inspired by Amy’s ASCII Cam project.

Totally coincidentally, when checking out Hack Manhattan, I came across their recent ASCII photo booth project, which takes a photo, converts it to ASCII art, then actually has an Arduino-controlled vintage typewriter type it out onto a sheet of paper for the user to take with them. So cool!

Hacker School Day 14: URL Shortener

I went to the Jobs Practice session on Friday and worked on the assigned project of making a quick URL shortener in 2 hours, which is practice for interview projects. I’d never done a URL shortener before, and hadn’t worked on web/PHP type stuff in awhile since I switched to iOS apps, so I was excited for the change of pace and the well-defined project.

I was confident that I could write a PHP script very quickly to do the URL shortening and routing, but as I put this up under a subdomain of an existing server I had running for another site, I had to make some tricky changes to the .htaccess file so that Apache would reroute all of the URLs for my shortener to the index.php file with all of my routing scripts. This proved trickier than I expected, since I’m not super familiar with the syntax of the .htaccess file and had some trouble getting it to route things properly.

Finally I got the .htaccess file to send things to my script so I could actually write the shortener, but I’d like to revisit it this week and learn enough that I can write that part more confidently in the future, and so that I can implement this version better than it currently is written.

I catch short URLs by grabbing the URL with PHP, then look up the short link in the MySQL database, and then redirect the page to the long URL.

1
2
3
4
5
6
7
8
9
10
11
12
13
14
15
16
17
18
19
20
21
22
23
24
25
26
27
28
29
30
31
32
33
34
35
36
if ((strlen($shorturl) > 0) && $shorturl != "shorten") {
        # should redirect to this url

  $query = "
        SELECT
        id,
        short,
        url
        FROM urllinks
        WHERE
        short = :shortlink
        ";
        $query_params = array(
                              ':shortlink' => $shorturl
                              );

        try{
            $stmt = $db->prepare($query);
            $result = $stmt->execute($query_params);
        }
        catch(PDOException $ex){ die("Failed to run query: " . $ex->getMessage()); }
        $goturl_ok = false;
        $row = $stmt->fetch();
        if($row){
            $goturl_ok = true;
        }

        if($goturl_ok){
            # redirect to the url
            header("Location: " . $row[url]);
            die("Redirecting to: " . $row[url]);
        } else{
            print("Redirect Failed. No such link.");
        }

}

If it’s not a short URL, then I look for POST variables to see if the user is trying to shorten their own URL. If so, and if it’s a valid URL, I generate a random string of 6 characters and store them in the database with the URL they should point to.

1
2
3
4
5
6
7
8
9
10
11
12
13
14
15
16
17
18
19
20
21
22
23
24
25
26
27
28
29
30
31
32
33
34
35
36
37
38
39
40
41
42
if(!empty($_POST['urltoshorten'])){

    if (filter_var($_POST['urltoshorten'], FILTER_VALIDATE_URL) === FALSE) {
        echo "<p>URL '" . $_POST['urltoshorten'] . "' is not valid.</p>";
    } else {

        function random_string($length = 6, $chars = '1234567890qwrtypsdfghjklzxcvbnmQWRTYPSDFGHJKLZXCVBNM')
        {
            $chars_length = (strlen($chars) - 1);
            $string = $chars{rand(0, $chars_length)};

            for ($i = 1; $i < $length; $i = strlen($string))
            {
                $r = $chars{rand(0, $chars_length)};
                $string .=  $r;
            }
            return $string;
        }

        $shortstring = random_string();

        $query = "
        INSERT INTO urllinks (short, url)
        VALUES (:shortstring, :urltoshorten)
        ";
        $query_params = array(
                              ':shortstring' => $shortstring,
                              ':urltoshorten' => $_POST['urltoshorten']
                              );

        try{
            $stmt = $db->prepare($query);
            $result = $stmt->execute($query_params);
        }
        catch(PDOException $ex){ die("Failed to run query: " . $ex->getMessage()); }
        $goturl_ok = false;
        $row = $stmt->rowCount();
        # share the new short url
        echo '<p>Shortened URL to <a href="http://prty.us/' . $shortstring . '">' . 'http://prty.us/' . $shortstring . '</a></p>';
    }

}

Otherwise, I return a pretty form for URL shortening that posts to this same page.

1
2
3
4
5
6
7
8
9
<form method="post" action="http://prty.us/shorten" id="shortenurlform">
  <div>
      <label for="urltoshorten">Enter your URL to shorten:</label>
      <input type="text" class="input-field" id="urltoshorten" name="urltoshorten" value="">
  </div>
  <div>
      <input type="submit" class="btn btn-default">
  </div>
</form>

Check it out! It was cool how simple this was to implement (the PHP part at least). I used Twitter Bootstrap along with a template I’ve used previously to get something nice-looking up very quickly. It’s also responsive (everything rearranges nicely if the screen size is smaller, like on your phone) without putting really any extra work into it, since that’s part of Bootstrap.

This made me miss doing web stuff and I’m thinking of doing more web development while I’m here. I find that every project I make needs a good website even just for marketing, and responsive mobile-friendly websites can be a great way to extend an iOS app’s functionality to other device platforms.

Hacker School Day 13: Mesh Messaging App

I couldn’t get my SecretHandshake app to work properly today after the OAuth changes I’d made, so I got to go on a bug-finding detective mission. I couldn’t find any code I changed that would make the app suddenly never have its bluetooth delegate methods called, and a lot of error-finding logs that were never called and indicated that nothing was wrong.

I used Git to create a branch of the project from the last version I know for sure works, which I have on TestFlight. I built that and ran it on the device, and it still didn’t work! At first I was frustrated, but then I realized that it meant it wasn’t anything in the code that was the problem after all. If I built it in the XCode6 beta, it wouldn’t ever detect other iBeacons, but if I built it in XCode5, it worked perfectly. Because I can’t build for iOS8 from XCode5, that means that I can’t get it to run on my iPod anymore at all. Hoping it’s a bug in the XCode beta and not some mysterious unannounced change in the OS that breaks iBeacons.

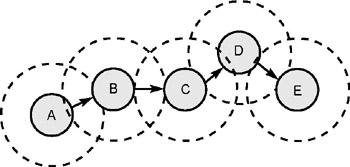
In the afternoon, I got to work laying out the framework for a Bluetooth LE based mobile ad-hoc mesh network using iPhones and CoreBluetooth (a lower level framework than iBeacons that allows me to send longer messages between phones). I built a simple app that lets you input a message and broadcast it to any other phones in range. It was very exciting that it works! I couldn’t get out of range of the phones while in the Hacker School space, so I’m looking forward to testing out whether the hopping is working (the phone that receives the message broadcasts it on to other phones).

I’m interested in pairing with some friends to figure out a network protocol that would work for sending messages between phones and for building the network. To send directed messages instead of broadcast, should there be a “message received” response sent by the phone when it gets there? Perhaps the “message” is modified in some way by each phone with headers indicating the path it successfully took to get to the intended recipient the fastest, which we could store as a way to map the network. I’m also interested in what we had discussed earlier in linking the mesh network to a trusted friend group to allow secure messages to be sent to the people they’re intended for.

The TorCoin model for route signing by each node is inspiring me with ideas for how each node in a mobile ad hoc mesh network might sign a message such that the network could perhaps get smarter about routing messages without having to broadcast everything to each node. Maybe we could incorporate a little bit of machine learning into the Mesh Messaging app (…meshaging?) to figure out the best routes to try for reaching particular nodes.

Hacker School Day 12: OAuth Success and Focusing on Goals

I grabbed coffee in the morning with Amy who does iOS development at Etsy, and she gave me some incredibly helpful advice on things to be sure to focus on while I’m at Hacker School. I left feeling excited about an idea from earlier in the batch of setting up an ad-hoc mobile network using iPhones over Bluetooth LE, and am hoping to get to work on implementing version one of that project. She also recommended contributing to a larger open-source project as a good way for someone like me who’s always worked independently on my own apps to get used to working within someone else’s larger code framework, which would be very relevant to doing iOS at a company where many developers are contributing to one project.

After talking through my OAuth handling in the Secret Handshake app with a couple of other Hacker Schoolers, and walking through each step in the OAuth process, I realized that I could handle the entire OAuth verification from within my iOS app, without relying on the external PHP file to request an access token from the server. I rewrote the OAuth handling in the app to use a custom URL scheme that redirects to my app as the Hacker School API redirect, and successfully got everything working. I wrote up an overview of the OAuth process on the app’s GitHub readme page, along with the exact query parameters that are required by the API at each step.

Later I finished up with getting a handle on iOS’s SpriteKit by implementing a Space Invaders game in Swift. I learned how to attach sound effects to actions in the game such as firing a bullet or a collision between two sprites on the screen (like an enemy and a bullet), how to keep score, and how to transition between different scenes in the game.

Following the repeated advice of Hacker School alumni, I decided to move on from the Space Invaders game as soon as I felt like I was no longer learning from it. I got a general sense of setting up the game play, but I stopped before making a perfect implementation of every feature in the original game. This is a big change from how I usually work— I feel a huge push to finish and perfect the work that I start, and it feels very strange and pretty luxurious to stop a project when it’s stopped being educational for me, but after refocusing on my goals a bit yesterday I’m impatient to learn new things.

I’ve been having trouble balancing two different ways of taking full advantage of my time at Hacker School. One is that I love being around so many smart, energetic peers who I can learn from and work with, and I have such a short period of time here to have access to that. I love the energy I get from talking to other Hacker Schoolers about code and projects, and there is so much that I’ve learned so quickly from other people here both through casual conversation over coffee and in a more formal study-group setting. I feel a lot of pressure to break out of my slightly more comfortable/habitual zone of coding alone to pair with and talk with other people at Hacker School, and to be involved in group projects that are happening around me.

This, combined with an impulse to grab hold of any kind of formalized workshop-style learning that’s happening around me due to the reassurance it gives that I’m for sure learning/accomplishing something if I participate in those, keeps leading me to participate in more formal talks/workshops that are happening in the space. It seems to reinforce my fear of missing out on learning whenever I see a group of Hacker Schoolers working through something in Hopper (the large group-work room) and I’m not participating. It feels like skipping class.

Then I go to a bunch of workshops, and sometimes they’re amazingly helpful and right in line with what my learning goals are here. And I think, I should go to more of these! But, other times, I realize a few minutes in that the workshop’s focus is not furthering my goals, and I get frustrated at missing out on what could have been coding time, which feels so limited already as my time at Hacker School is flying by.

So, I think I need to just be more aware of the pitfalls of participating in something just because I feel like I “should”, and do a check with myself before I sign up for things during Hacker School hours to make sure they line up well with what I’m already working on and interested in here.